Wednesday, August 29, 2012

I Musta Been Nuts!

I've been working with wire since I was a kid, as I mentioned in a previous post.  Even before the wonderful array of colors of Artistic Wire and other art wires were invented, I haunted hardware stores for a variety of gauges of copper, brass and any other metal wire I could find.  Because the wire in hardware stores is made for utility and function and not for creating art, I ended up using fairly heavy gauge wire to create my pieces.

Since I also have a passion for gourds, it was just natural for me to combine wire and gourds, right?  So I began the painstaking process of weaving fairly heavy copper wire over a bottle gourd that looks like a genie's bottle, which is what I named the piece.


This gourd seemed to take forever to make, because wire likes to kink.  So with each stitch (of which there are hundreds!), I had to use my small needlenose pliers to straighten the stitch out so that it formed a smooth curve...


 As I was getting crankier by the minute while working on this gourd, I thought, "Whose idea was this anyway??"  Sometimes my brain makes wonderful pictures of art for me to create...and sometimes it's easier said than done!  And when all was said and done, I was thrilled with this piece!

Ciao for now,

Deborah

Monday, August 27, 2012

It's a Sea Urchin!

I decided to treat myself to a bit of indulgence and took a class from a long-time artist friend, Marilyn Moore, whom I met in the late 1980s when I joined the Northwest Basketweavers Guild. We were both basket weavers at the time and have since explored the wonderful world of texture, color and materials.

Both Marilyn and I have a fondness for working with wire in a variety of forms.  She designed a number of project classes using wire that she teaches all over the country, including right here at home at Fusion Beads in Seattle.  If you've never been to their store on Stone Way, it's worth a visit, even if you're not a beader.  There's plenty of eye candy and luscious things to touch!

So I played hookey from work last Friday and took Marilyn's "Sea Urchin" pendant class.  The pendant starts out with a natural stone "donut" that serves as the foundation for the wirework.


Using fine wire and a very small, steel crochet hook, you begin crocheting as if you're making a wire doily.  Still using the crochet hook, you begin forming loops of wire that actually create a knitted "fabric".  We strung beads on the wire before beginning, so that we could incorporate a bit of bling into the finished product.

So here's my first Sea Urchin...


The entire pendant is about 2.5" in diameter.  There is a bail on the back so that I can place it on a necklace.  Of course I'll have to make a silver or beaded necklace for this pendant!

I'm off to work on another Sea Urchin...ta ta for now!

Deborah

Friday, August 24, 2012

Wild About Wire

Yes, I have to admit, I'm wild about wire--any size, color or texture, plain or woven into mesh.  I think I've actually confessed to this in a previous post, mentioning that my fascination with wire began in junior high school when my father brought home a wad of telephone wire that he got for me.  You've seen the wire, I'm sure.  Each strand is coated in a different color, often with striping--ready made to make something wonderful with it!  So of course I made wire and bead earrings with the telephone wire.

Well, I've moved beyond the telephone wire, now making jewelry with silver, copper and brass wire.  But even before I moved into the realm of making more "upscale" jewelry than using telephone wire, I discovered wonderful wire mesh.  This is actually for industrial use but has been a happy discovery by those of us who like to make things.

After making woven sculptures and baskets for years, discovering wire mesh was just like working with magic!  You shape the mesh, and it miraculously stays where you've mushed it!  No more wishing for a 3rd or 4th hand to hold all the materials in place while I wove them!

So here's the first wire mesh sculpture piece that I made...

Emerging

Here's a closeup of the VERY labor-intensive embellishment on this piece...


And since I'm a glutton for punishment, I immediately made another, labor-intensive wire mesh sculpture!

Swirling
In case you can't tell by now...I'm a process person, and yes, I find this kind of work relaxing and meditative--go figure!!

Cheers,

Deborah

Wednesday, August 22, 2012

The Guardians

As I've mentioned before, I belong to an art group that meets monthly and is made up of a collection of wonderfully creative women.  Each month a member volunteers to teach and share either a project or technique with the group.  Quite a while ago, my friend, Joanne shared a fabulous small goddess figure with the group.  We made these enchanting figures out of polymer clay--mostly using Sculpey, which is easy to work with.  Here's the goddess I made in that learning session (I added the beaded and wire embellishments at home)...her name is Persephone.


Persephone

I had so much fun creating this little figure, that I made 2 more.  I decided that they are Guardians.  So here are the next 2 I made...

Guardian of Soft Sunsets

And being a watery Cancer with an affinity for mermaids...

Ocean Spirit

Ocean Spirit - portrait
As you can see, I love to add wire, beads and  lots of texture to the basic polymer clay figures.  These guardians were just too much fun to make...I've got a few more ready to fancy up...stay tuned!

Ciao for now,

Deborah

Monday, August 20, 2012

More Zentangle®

I thought I'd share more of my Zentangle® work with you.  When I began doing Zentangle, I quickly became obsessed with it and wanted to incorporate it into other forms of artwork that I already do.  A natural place to try Zentangle was with my gourds (another obsession of mine!).

I decided to use a small piece of a broken gourd to experiment with the Zentangle technique.  Since the surface of a gourd is smooth and tan colored, often with areas of discoloration from the mold that forms during the drying out process, I decided to cover the surface with paper.

I hand dyed tissue paper and glued it onto the surface of the gourd in random patterns, creating a melange of colors.  Once the paper was good an dry, I used the same Micron pens I used for Zentangle on drawing paper and created my designs on the piece of gourd.

Here's what I made in that first experiment...

My Zentangle Life
I was so pleased with this experiment, that I added wire and bead edging and named the piece.  I decided it would be the first of a series of wall talismans that I'd make.

Here's the next talisman I made, also from a free-form piece of gourd...

Peace and Love
This talisman, "Peace and Love" was made using the same technique as my first "experiment".    Since then I've made several more talismans...had to stop making them, because I ran out of wall space on which to hang them!  So then I moved on to doing Zentangle on large gourds...more about them in a later post!

Cheers,

Deborah

Friday, August 17, 2012

Wild About Zentangle®

A couple of years ago I discovered Zentangle® , a form of repetitive design that is very meditative and relaxing to do.  A couple, named Maria and Rick have developed this intuitive, Zen-like form of doodling into an amazing artform that anyone can do.  If you want a huge dose of inspiration or just some delicious eye-candy, you'll be in for a treat when you visit their website and blog.

Here are some of my early designs that I specifically drew to print onto tee shirts.


Here's a second design...


If you'd like to see more of my Zentangle-inspired artwork, you can visit my website.  I have Zentangle-inspired gourds in the Blue Moon Basket section, and there is other Zentangle-inspired work in the WildHeart Mixed Media section.

Enjoy!

Deborah

Wednesday, August 15, 2012

Enshrined--The Nitty Gritty

So now that you've seen my shrine in Monday's post, I thought I'd show you the details that I included.  This was the fun part for me, as I considered the shrine a "blank canvas" waiting to be embellished.

Here's detail of the window on the cover...I've used copper sheet metal around the edges of the window, copper beads and embossed and painted metal.


The inside of the flap that closes the shrine also has embossed, painted metal as well as buttons and a large bead wired onto it for the closure.


I've affixed a copper bead and beaded necklace to the Egyptian figure on the inside of the cover, to add some dimension to the images.


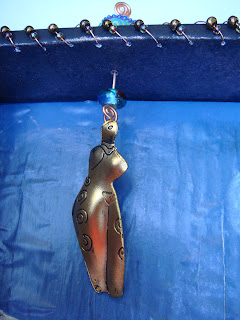
Finally, on the inside box of the shrine, I've used copper wire and glass beads around the upper and lower edges, hung a beautiful metal goddess...


and embellished the moon image, of course!


And there you have it!  Hope you've enjoyed the tour!

Ciao for now,

Deborah

Monday, August 13, 2012

Enshrined--Part I

I've long been intrigued by shrines and have wanted to make one.  Through the years I've collected all manner of boxes and containers that would work well for shrines.  Finally, this past week I made a shrine!  I used a sturdy box that I recycled from a DVD I received in the mail.  

So I'm sharing the results with you today...


The closed shrine with a "window" on the cover.
 
Here's the window open...


Here's the shrine opened up...


Here's a closeup of the inside of the cover...


And last, but not least, here's a closeup of the inside of the shrine box...


Stay tuned for a closeup of all the details I had fun incorporating into this shrine.

See you on Wednesday,

Deborah

Wednesday, August 8, 2012

A Doozy of a Find!

I have to admit a secret addiction to cupboards, containers and boxes...always on the lookout for just the right container to stash specific items.  So imagine my delight when I was at the local dump getting rid of a truckload of junk and saw IT...the absolute perfect place to keep all those little bottles of craft paints.  They were loose in my studio creating havoc, and here was the chance to corral them all into an organized bunch!  Tell me, how could I resist this??


This case is truly industrial strength--guaranteed to protect its contents in the event of a natural disaster.  In theory, it's portable (notice the handle??)...even empty it weighs a ton!  Although I have been known to drag it from room to room.

Check out the inside--isn't this just perfect??


Not only are there shelves, but the inside of the lid has clear pockets.  So you can store tubes or small items and actually see what's in each pocket.  I couldn't have custom ordered a more perfect cupboard for my paints...ah...the lucky find!

You just never know where the perfect treasure is lurking...happy hunting!

Deborah

Monday, August 6, 2012

Love, Love, Love!

I belong to an art group of wonderful women that meets monthly.  A part of the group decided to do an altered book exchange a couple of months ago.  The idea is to swap books every month so that each member of the group works in each book.I bit the bullet and joined this group, which was the ultimate challenge for me. 


I've been going to the library and revering books since I was old enough to walk.  If there was anything that was drummed into my little brain as a child, it was to NEVER, EVER deface or hurt a book.  Fold the corner of a page to mark your spot??  No, no, no!!!  Place an open book face down?? Never!  You're break the spine!  Write in a book??  Unthinkable!!


As a college student, I did make the leap to using yellow highlighters--seemed that was the only way I could force myself to read a textbook.  So you can imagine how the thought of ripping pages out of a book, gluing pages together, painting and drawing in a book, cutting pages up and the like just makes me break out in hives!


Well, I've successfully managed to alter a couple of page spreads as we've exchanged books each month.  Here's the latest double-page spread I did in a book whose theme is "Love".  First, I  covered the pages with gesso so that the text was pretty well covered and also to add a layer of "umph" to the thin paper.


Next, I layered 2 colors of paint onto the pages...


Ta da!!  The finished product...on the left side I pasted in a verse from the song, "Put a Little Love in Your Heart" by Jackie DeShannon.  Anyone remember that great tune from the '60s??  On the right side, I pasted in layers of cut-out hearts.  


I topped it off with a fold out of 4 hearts strung together, with L-O-V-E spelled out.


I have to admit, I did have fun working on this book and hope that the library police don't find me anytime soon!


Happy reading,

Deborah

Wednesday, August 1, 2012

My Fancy Journal

The first class that I was invited to teach at the Sedro-Woolley Library in June was "Decorate a Personal Journal".  It was a challenge to come up with an enticing project to be completed in only 2 hours.  Since it's summertime (yes, really!) and people are travelling and doing fun things, I decided that everyone could use a special journal.


The old black and white composition books that we all used in school presented the perfect blank canvas to decorate.  Using fancy papers, old greeting card pictures and patterned tapes, creating an amazing journal happened like magic.  Here's the journal I made as a sample...


I added a ribbon to mark my place in the journal...stacked 3 buttons from my stash and used copper wire to attach them to the front cover...added an elastic hair tie in neon green and voila! I had a closure and fancy finish to my journal.


I made this journal horizontal so that the cover opens like a pad, since I'm left-handed, and the bindings always get in my way.  I'm thoroughly enjoying my scribbles in this journal and can always find it buried on my desk!


Ta-ta for now!


Deborah